
Erskine Chapel's Roof Restoration
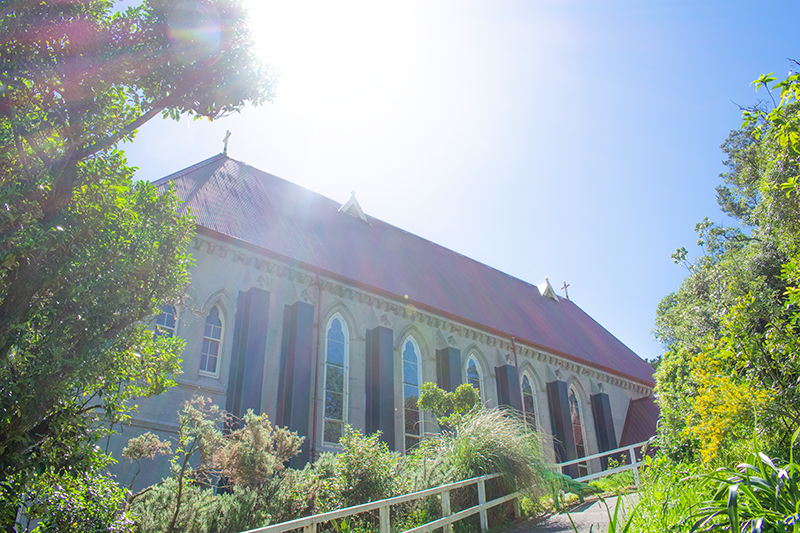
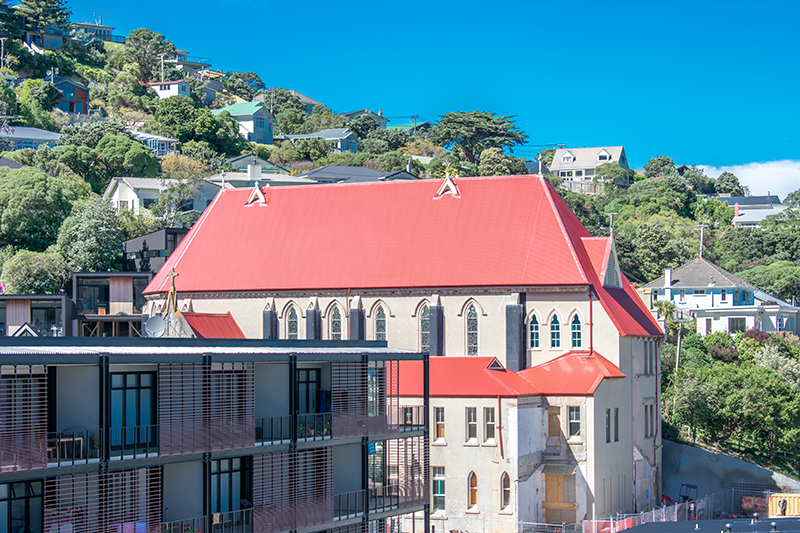

Restoring one of the finest examples of Gothic architecture in New Zealand was always going to be an interesting challenge. A collaboration between architects, engineers, heritage organisations, and construction contractors achieved exactly that with the chapel at the Erskine College in Island Bay, Wellington.
The college, a Catholic girls’ boarding school, was built in 1905 - 1906 by the Society of the Sacred Heart (Sacré Coeur). Although enrolling its first pupils 1907, the chapel wasn’t built until the 1930s.
Both the original school building and the later addition of the chapel were designed by renowned Wellington architect John Sydney Swan, known for designing in the traditional Gothic and Classical styles.
Originally known as the Covent of the Sacred Heart at Island Bay, its name was changed to Erskine College in the late 1960s. The school closed its doors in 1985 and since then the buildings have been used extensively for various arts groups and as a venue for high profile events such as the International Festival of the Arts. Its exceptional acoustic quality made it a perfect venue for many notable musical performances.
The chapel was constructed using unreinforced brick masonry walls, timber, steel, and concrete. It features a majestic, vaulted ceiling, an Italian Carrara marble interior (including a marble altar), and lead lighting.
The chapel is widely regarded as a masterpiece of French Gothic architecture. Heritage New Zealand lists the chapel as a Heritage New Zealand Category 1 Historic Place.
The buildings, including the chapel, were closed for public access due to earthquake concerns.
“We considered the heritage status of the building with every decision. We also worked alongside a heritage architect (Ian Wild) on the decisions before presenting to the council and other interested parties for approval.”
“Unfortunately, the main building was in very bad condition. Despite great efforts to save it, the price tag to repair was just not feasible,” said architect Tobin Smith. “To get permission to demolish it we had go through a formal hearing process with Heritage New Zealand, the Wellington City Council and a private trust who were all interested in the site.”
Smith said the interior of the building is spectacular and they didn’t want to damage it. The roof, however, was a clear decision. It was in a bad state, and replacing the roof with a modern, lower maintenance, option “was a good choice”.
The engineer advised replacing the roof diaphragm. “We made the decision to take the roof off and replace the roof diaphragm from the topside. That meant we had to re-purlin and roof it from the upper face.”
Smith said they were working with “a pretty steep topography”. The chapel is three storeys high on the front face and two storeys high on the rear face. “We took the elevation down another storey by building a carpark and a podium in front. A shotcrete wall on the side also limited access. The scaffolding was quite impressive.”
Johnson Brothers (Featherston) was employed as the main contractor. Wayne Johnson, managing director, says they decided to do all the strengthening of the building structure from the outside. “The heritage architect didn’t mind if you could see there was work done from outside, because that became part of the building’s history. They didn’t want lose any of the look inside, though.”
They started by putting ground beams below the chapel. These steel cages encapsulated the buttresses on the outside of the walls. The steel ran up the walls to gutter level.
“When we got to the roof, we took all the old roofing off and created a plywood diaphragm brace. We first installed the diaphragm, the purlins on top of that, and then the new roof cladding.”
You often had to design things on the go. Johnson gives an example of the buttressing steel that go right around the outside of the building. “At one part of the building (the ballroom) three of them went straight through the existing box gutter. We needed to get that to work.
“When we took the roof off, we had to retro-tie the existing timber structure to the concrete bonding. It is a double skinned building with four layers of brick inside and three layers outside, and a two-inch cavity between them. The cavity altered, of course, as it went up the building through different layers of blocks.
“We fitted the diaphragm brace on top of the old sarking, and that tied all the fixings of the existing timber components to the concrete structure.”
Even with all the scaffolding, the team had to create harnessing points to work on the high-pitched roof.
“It is a 55° gable roof, and it is 15 m high at spouting height. Considering the pitch, you can add another 9 m to the working height.”
Wayne Johnson says, “we created two loading platforms at spouting height, one on each side of the building. The plywood, roofing steel, and purlins were craned up there.
“We also created some anchor points about 300 mm below the ridgeline and at 300 centres apart. We then put a static line through those so we could hook our harnesses on there to work on the roof. Later we made a flashing that went around the anchor points and under the new ridging.”
The anchor points are still there and they are rated, so future workers can use it in the same way.
“At any one time we had up to eleven people on harnesses up there. It looked quite spectacular from below.”
Despite all the safety measures, working on the roof was not for the faint hearted. “As you can imagine, Island Bay is not the most fun place to be in a gale force nor’ westerly. Especially when you are handling 8x4 sheets of plywood and 11 m roofing sheets,” said Johnson.
To protect the interior of the chapel and prevent weather ingress they replaced the roof in sections, taking the old cladding off and putting the new cladding on as soon as possible.
“As we put the diaphragm on, we screwed the purlins to the diaphragm at 600 centres. That created a rough ‘staircase’ as we went up the roof, but you still needed a harness.
“We still used supporting roofing underlay and then screwed it down according to High Zone requirements.
“Putting in a new substrate for the roofing was great. With the old roof it was nailed straight into the sarking.”
The new plywood diaphragm was fixed using 65 x 10G stainless steel flooring screws and the 90 x 35 tanalised purlins were screwed in at 600 centres. They were double screwed on each side over the joints, so every sheet of ply became a diaphragm. “We created the diaphragm by screwing through the purlins at 150 centres, tying everything together. Every other one got bugled through to the rafters.”
The architect decided from the start on a like-for-like strategy. “We looked at a modern COLORSTEEL® cladding [0.4 mm Scoria Corrugated COLORSTEEL® Endura] that was almost identical to the colour painted on the old roof,” said Tobin Smith. “It was a really good match. You could hardly tell the two apart.”
“…it was certainly not an easy roof to replace. There were dormer events and other details around the roof that all had to be incorporated again,” said Smith.
Wayne Johnson agrees. “Every single flashing was measured and made to suit. “
The lower levels had old lead stepped flashings cut into the block. The new roof was 75 mm higher.
“We cut a slit into those walls and then made a three-piece flashing. The main flashing went up and over, like side flashing. The flashing that went into the rebate we cut was sealed in and then a hat piece went over the side flashing. We did that purposely so the URM part of the building could move independently from the roof part. It should give the building some elasticity and at the same time the left-over lead is encapsulated and out of the way.”
Reroofing the Cohen building was standard by comparison. The building is about 9 m x 40 m with a mono-pitched roof at 5°.
“We replaced the beams with new steel girders and top and 8x2 purlins bolted to those, with a tray cladding.”
“The Cohen building had a lot of penetrations, but they were all in a row. For those, we used a standard over-flashing the ran up to the ridge.”
The main building of the college was replaced with a townhouse development.
“We certainly tried to respect the surrounding buildings and other houses in the suburb, especially regarding the scale of the townhouses. When you drive into the development, the dwellings are smaller, but the ones facing into Avon Street is slightly larger in scale to try and bleed the scale back into the development, rather than going for stand-alone-houses,” said Tobin Smith.
There is a combination of the steep gable roofs and the flatter mono-pitched typology to work in with the topography of the site.
“The combination of the gable and mono-pitched roofs help to preserve the outlook from within the development, for example, the dwelling lining the eastern side of the main route coming past are flatter to allow the ones behind them a view over them.”
The townhouses boasts a mixture of 45° gable roofs and 4° mono-pitched roofs to give a flat elevation. Smith said some of those dwellings are three storeys from the street up, albeit it they take up the topography, so they are only two storeys on the back. “When you have a two or three storey dwelling behind it, it is quite nice to keep the roof-form low so they can also have an outlook, rather than forcing those gables everywhere.”
The gable roofs give those dwellings a sense of individual ownership or individuality. The roofs don’t encapsulate all the dwellings, they encapsulate individual dwellings, you get the notion that it is a development of small houses, not a development made up of an apartment type complex.
Metal wall cladding covers concrete walls over lower two floors and then transitions onto timber framing on the upper floor. “In some cases, we had to batten over concrete to fix the cladding and in other instances the cladding sits over a traditional timber construction.”
We clad the block in standing seam cladding. We originally suggested we put them in a timber clad. But they are offset in the planning, and they share an external wall to the boundary. That meant we could use a combustible material. The standing seam cladding gave us the look we wanted, while satisfying the fire requirements.